Getting Started With Storybook Without a JavaScript Framework
Use it with plain HTML and CSS
We all want to use well-documented UI components in our Frontend. With Storybook, you can do that reasonably quickly with React, Angular, Vue, or any other framework.
But since the documentation lacks clear information about how to set up Storybook without any JavaScript framework, I'm going to write it all down for you because it is possible to use plain HTML & CSS.
Want to learn more about why you should use Storybook, check out "Why You Should Always Use Storybook When Developing User Interfaces" by Tyler Hawkins.
Installation
Add Storybook by running the following command in the terminal.
npx sb init
This command will add all the dependencies for Storybook and create initial files so that you can get started right away.
After installation, you will see a question "Do you want to manually choose a Storybook project type to install?", for this, you type yes.
Second question: "Please choose a project type from the list", for this, you type HTML.
Now the CLI will set everything up to use Storybook with plain HTML.
Run npm run storybook when the installation is finished.
Global setup
When you check your directory, you will see a folder .storybook. In this folder, there are two files, main.js and preview.js .
In the main.js file, you can configure what directory will be checked for *.stories.js files (other file extensions are possible). Storybook also has a plugin system called addons which you can add here as well.
In the preview.js file, you can add everything that needs to be loaded while previewing your UI components.
For example, add your global CSS file or icon font to have it available in all the components.
Example story file for plain HTML
In the stories folder, you will find the files Button.stories.js. It looks like this.
import { createButton } from './Button';

export default {
  title: 'Example/Button',
  argTypes: {
    label: { control: 'text' },
    primary: { control: 'boolean' },
    backgroundColor: { control: 'color' },
    size: {
      control: { type: 'select', options: ['small', 'medium', 'large'] },
    },
    onClick: { action: 'onClick' },
  },
};

const Template = ({ label, ...args }) => {
  // You can either use a function to create DOM elements or use a plain html string!
  // return `<div>${label}</div>`;
  return createButton({ label, ...args });
};

export const Primary = Template.bind({});
Primary.args = {
  primary: true,
  label: 'Button',
};

export const Secondary = Template.bind({});
Secondary.args = {
  label: 'Button',
};

export const Large = Template.bind({});
Large.args = {
  size: 'large',
  label: 'Button',
};

export const Small = Template.bind({});
Small.args = {
  size: 'small',
  label: 'Button',
};
This is an excellent example of how a story file looks like. The code in Button.js will create a <button> element.
import './button.css';

export const createButton = ({
  primary = false,
  size = 'medium',
  backgroundColor,
  label,
  onClick,
}) => {
  const btn = document.createElement('button');
  btn.type = 'button';
  btn.innerText = label;
  btn.addEventListener('click', onClick);

  const mode = primary ? 'storybook-button--primary' : 'storybook-button--secondary';
  btn.className = ['storybook-button', `storybook-button--${size}`, mode].join(' ');

  btn.style.backgroundColor = backgroundColor;

  return btn;
};
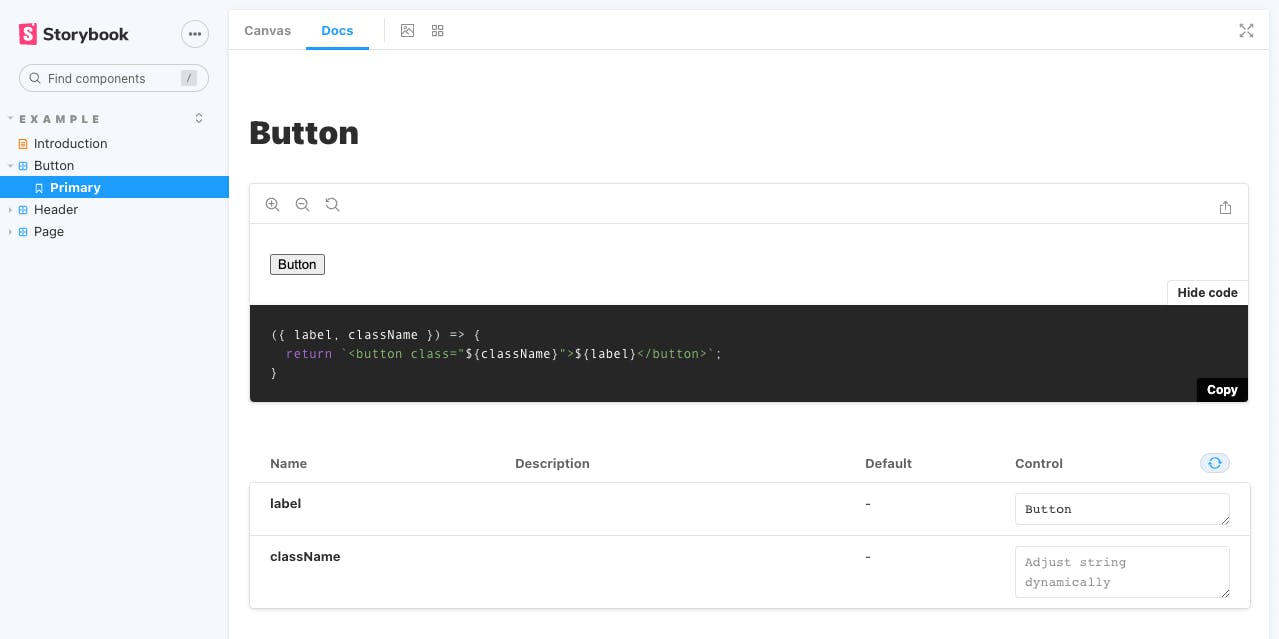
Even though it looks good and clear, the way the createButton is creating a <button> tag doesn't let us generate a clear code example to copy and paste (I will show you 😉). So we're going to do it a bit differently.
Plain HTML story with code example
To make this work, we need a Storybook addon. Run the code below to install it.
npm i @storybook/addon-storysource
After installation, add it to the .storybook/main.js file like below.
module.exports = {
  "stories": [
    "../stories/**/*.stories.mdx",
    "../stories/**/*.stories.@(js|jsx|ts|tsx)"
  ],
  "addons": [
    "@storybook/addon-links",
    "@storybook/addon-essentials",
    "@storybook/addon-storysource"
  ]
}
Create a folder helpers in the stories folder. In that folder, create a file, code-example.js. In this file, we will create a helper function that generates data for our code example.
function addCodeExample(component, templateConfig) {
  if(!component || !templateConfig) return

  component.parameters = {
    docs: {
      source: {
        code: templateConfig({
          label: component?.args?.label,
          className: component?.args?.className
        })
      }
    }
  }

  return component
}

export { addCodeExample }
In this function, we take the component and the templateConfig as parameters. These parameters are going to provide us with information from the components themselves.
For this example, I will minimize the length of the Button.stories.js by adding only one example of a button. So copy-paste the code below.
export default {
  title: 'Example/Button',
  argTypes: {
    label: { control: 'text' },
    className: { control: 'text' }
  },
};

const Template = ({ label, className }) => {
  return `<button class="${className}">${label}</button>`;
};

export const Primary = Template.bind({});
Primary.args = {
  label: 'Button',
  className: 'button-primary',
};
If you check the button component in Storybook, your code example will not be ready to copy-paste yet.

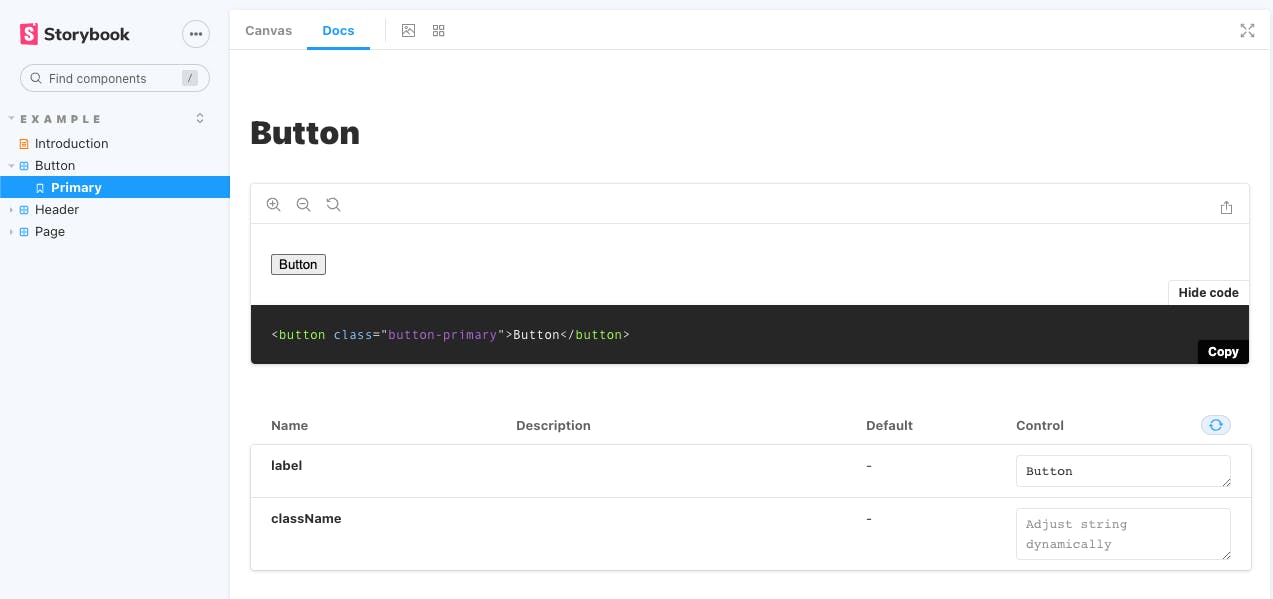
By using the function to generate that example, you will see the difference.
import { addCodeExample } from './helpers/code-example'

export default {
  title: 'Example/Button',
  argTypes: {
    label: { control: 'text' },
    className: { control: 'text' }
  },
};

const Template = ({ label, className }) => {
  return `<button class="${className}">${label}</button>`;
};

export const Primary = Template.bind({});
Primary.args = {
  label: 'Button',
  className: 'button-primary',
};
addCodeExample(Primary, Template)
Here you can see that I added Primary as the first parameter and Template to the next. This will generate the simple HTML code you can copy and paste.

Conclusion
Now that you know how to use Storybook with plain HTML and CSS, you can create your UI components much more effectively!
Storybook is a great tool to use in any web application. I’m super happy with it! If you want, check out their project on GitHub and show some support!
In what kind of application or architecture are you using or planning to use Storybook? Please let me know.
Thanks!
 I hope you learned something new or are inspired to create something new after reading this story! 🤗 If so, consider subscribing via email (scroll to the top of this page) or follow me here on Hashnode.
Did you know that you can create a Developer blog like this one, yourself? It's entirely for free. 👍💰🎉🥳🔥
If I left you with questions or something to say as a response, scroll down and type me a message. Please send me a DM on Twitter @DevByRayRay when you want to keep it private. My DM's are always open 😁
